List of Help Articles
Overview of Batoi Hosting Renew Your Domain Name with Batoi Protect or Lock Your Domain Name with Batoi View Action History of Your Domain Name Manage Name Servers for a Domain Name Forward a Domain Name to a Different Website Handle Privacy Protection for a Domain Name Domain Name Whois Data Reminders from Batoi Modify the Contact Details of Your Domain Name Backup Your Website with cPanel on Linux Managing DNS Records in Linux Hosting via cPanel: A Comprehensive Guide Create FTP Accounts in Your Linux Hosting using cPanel Backup and Restore Your Linux Hosting Account via cPanel Effortless 301 and 302 Redirects in Linux Hosting: A Detailed cPanel Guide How to Seamlessly Manage DNS Records with Batoi's Premium DNS Service through Your Domain Control Panel Mastering Contact Management within Batoi's Domain Control Panel Step-by-Step Guide: Managing Business/Enterprise Email via My Domain Control Panel How to Efficiently Manage Users and Assign Administrative Roles in Google Workspace A Complete Guide to Purchasing and Managing Google Workspace through Batoi Hosting Control Panel Effortless Migration from cPanel Email to Google Workspace: Your Step-by-Step Guide Setting Up Google Workspace Using cPanel: A Comprehensive Guide How to Add an SPF Record to Your DNS Settings for Email Security Setup of Microsoft Office 365 Using cPanel: A Comprehensive Guide Reviewing Your Linux Hosting Resource Allocation and Usage in cPanel Creating and Managing Sub-domains with cPanel on Linux How Do I Emulate DNS Change on My PC? Effortless Migration from cPanel Email to Microsoft Office 365: Your Step-by-Step Guide How to Set up MFA for Your Microsoft Office 365 Outlook Account Setting up POP or IMAP Email on an Apple iPhone Creating and Managing MySQL Databases with cPanel on Linux How to Fix the Error '0x800CCC1A' in Microsoft Outlook? How to Fix the Error '0x800CCC78' in Microsoft Outlook? Setting up Email Account on Your Mac Mail Application Installing WordPress within Your Hosting Account with cPanel on Linux Setting up POP or IMAP Email on an Android Phone Setting up Mozilla Thunderbird as Your Email Client in Windows PC Setting up Microsoft Outlook as Your Email Client in Your Windows PC Setting up Mozilla Thunderbird as Your Email Client in Mac Creating Email Accounts with cPanel on Linux Creating More FTP Accounts with cPanel on Linux Accessing cPanel and Webmail on Linux Generate a Certificate Signing Request (CSR) Generate the Domain Secret or the Authorization Code for Your Domain Name How to Fix the Error '0x800CCCDD' in Microsoft Outlook with IMAP Server? Comprehensive Guide to Managing PHP Settings in cPanel on Your Linux Hosting Account Integration of Google Analytics on Your Website My Emails Are Bouncing Back. What Should I Do? What should I do when I cannot access my email or website on My Windows PC? Password Protect Files and Folders with cPanel on Linux Transfer Your Domain Name from your Current Registrar to Batoi Uploading Your Files with an FTP client (FileZilla)

Password Protect Files and Folders with cPanel on Linux


This article provides the detailed information on how you can create password protected files and folder with your Linux hosting control panel.

Login to your hosting control panel using the access details you have received from 'Batoi Priority Support'.

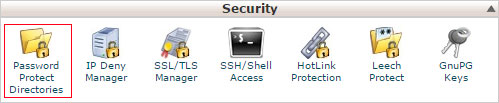
From the home page click 'Password Protect Directories' under the 'Security' section as shown in Figure 1.

Figure 1
Figure 1

After clicking the 'Password Protect Directories', system will ask you to select the directory in a popup screen as shown in Figure 2.

Figure 2
Figure 2

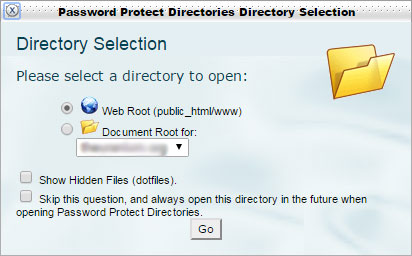
Select the 'Web Root' and press the button 'Go' and system will open the root directory of your hosting with the list of directories as shown in Figure 3.

Figure 3
Figure 3

Here you can choose the directory which you want to password protect. To do so select the 'directory' by clicking it. After clicking the password protection page will appear as shown in Figure 4.

Figure 4
Figure 4

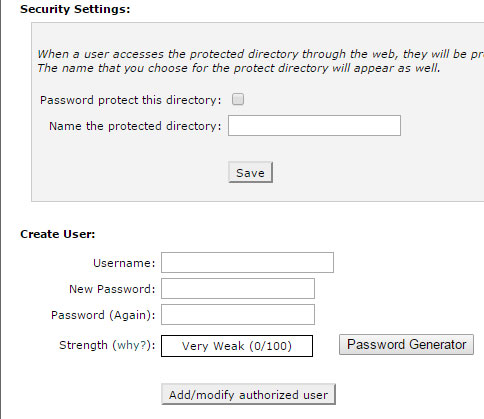
Here you need to click the check box 'Password protect this directory' and you need to give a name to the directory in the textbox besides the 'Name the protected directory' and press the 'Save' button as shown in Figure 4.

Upon doing so your directory is now password protected. Now the next step is to open the particular directory using some password.

To do so, go to the next section under the 'Password protect this directory', meant for 'Create User' as shown in Figure 4. Here you need to give the 'Username' and 'Password' for that user. Then press the 'Add/modify authorized user' button. Now you can share this 'Username' and 'Password' with the user to whom you want to give the access to open this folder.

When a user types the 'URL' for that particular directory a password box will appear in the screen as shown in Figure 5 and by entering the correct Username and Password that particular user can login to the directory.

Figure 5
Figure 5