 Batoi Support
This article provides the detailed information on how you can emulate DNS change through Windows 'hosts' on your PC by following the specific instructions.
The following steps will help you emulate DNS change through Windows 'hosts' on your PC.
What is 'hosts' file?
The 'hosts' file is a text file that contains IP addresses separated by at least once space and then a domain name, with each entry on its own line that specifies to your PC what IP address a domain name should point to.
During the website migration process, while our Support team tests all migrations performed before marking it as complete, you can also test if the website is working exactly as expected. Our recommended way of testing your website before changing the DNS settings is through the use of a modified 'hosts' file.
What is 'hosts' file modification?
Modifying your 'hosts' file allows you to override the DNS for a domain name, on your PC. By changing the 'hosts' file, you can send only your PC to the new server without affecting the live site at all by manually setting the IP address for a particular domain name and telling it where to go in stead.
How do I modify my 'hosts' file?
To perform a 'hosts' file modification, you will need to first run 'Notepad as administrator'. This is because the 'hosts' file is a system file and cannot be modified otherwise.
How do I modify my 'hosts' file in Windows 7?
To perform a 'hosts' file modification in Windows 7, follow the steps as mentioned below.
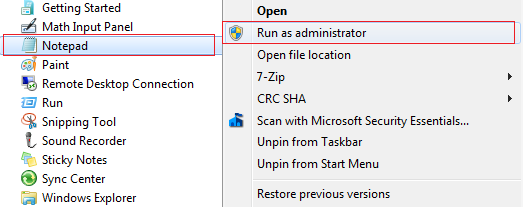
Locate Notepad within your Start menu. If it is not already there, you can type 'notepad' in to the search box to show it. Then, right-click on it and click on 'Run as administrator' as shown in Figure 1.
After you have 'Notepad' up and running as 'administrator', you can then locate your 'hosts' file and open it.
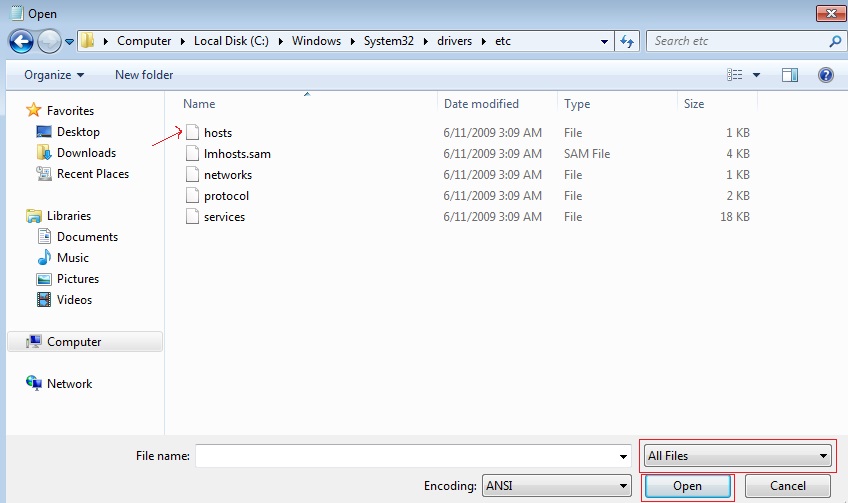
Note: The 'hosts' file can be located at 'c:\windows\system32\drivers\etc'
With 'Notepad' already open, click on 'File', then 'Open.... As the 'hosts' file is not a standard .txt file as 'Notepad' will look for by default, you need to change the drop-down in the bottom right that says 'Text Documents (*.txt)' to in stead display 'All Files'. Navigate to the location of your 'hosts' file and double-click on it to open the file in 'Notepad' as shown in Figure 2.
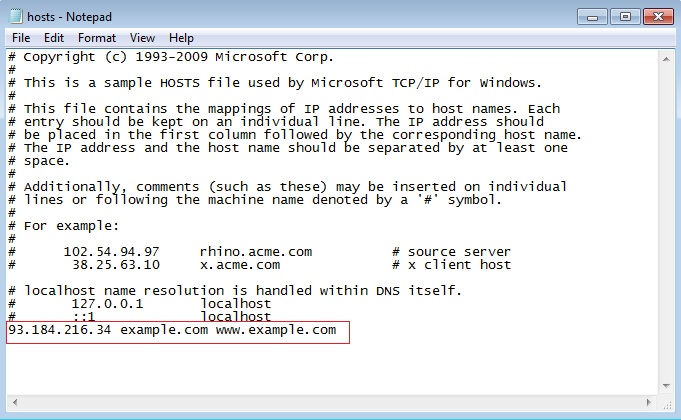
Now that you have your 'hosts' file open, its time to edit it. Within your 'hosts' file, you should see something similar to as shown in Figure 3.
Note: Modifying the 'hosts' file on your PC incorrectly can interfere with name resolution. Make sure to keep a backup copy of the 'hosts' file before modifying it.
Start on a new line at the bottom of the file. Type the IP address (your new hosting account's IP address for your domain name), press the 'TAB' key, then type the domain name and press the 'TAB' key, then type 'www.domain name' as shown below.
For Ex.: 93.184.216.34 example.com www.example.com
After making the change, click on 'File', then 'Save'. You have now made your 'hosts' file modification.
Close all open browsers before attempting to browse to the domain name.
Note: Remember, this is only a temporary fix and works only on the PC where you changed the 'hosts' file. Once your DNS is changed and it is propagated fully, you will need to remove these lines that you added to the 'hosts' file.
Once you have modified your 'hosts' file, it is recommended that you flush the existing DNS cache from your PC so that your 'hosts' file changes can take effect immediately.
What is DNS cache?
Your DNS cache stores the locations (IP addresses) of web servers that contain web pages which you have recently viewed. If the location of the web server changes before the entry in your DNS cache updates, you cannot access the website. After you clear your DNS cache, your PC will query nameservers for the new DNS information.
How do I flush my DNS cache?
To flush your DNS cache if you use Windows 7, perform the following steps:
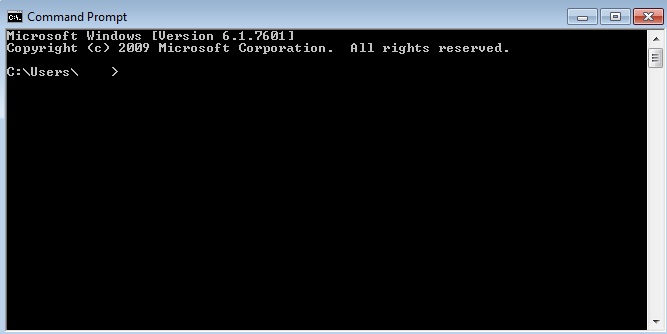
In Windows, select 'Start>>Programs>>Accessories>>Command Prompt'. This will give you a window like the one as shown in Figure 4.
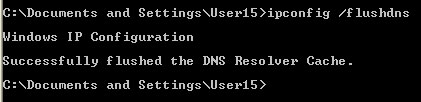
Type the command 'ipconfig /flushdns' and press 'Enter'.
If all goes well, which it should, you will see the following confirmation message as shown in Figure 5.
How do I know that my 'hosts' file modification worked?
The easiest way to see if your 'hosts' file modification worked is to run a ping test. To test that the domain name is pointed to the correct IP in your 'hosts' file, please follow the steps as mentioned below:
In Windows, select 'Start>>Programs>>Accessories>>Command Prompt'. This will give you a window like the one as shown in Figure 6.
Enter the command ping, followed by a space, then the domain name as shown in Figure 7.
ping example.com and press Enter.

The response should come from the IP as set for the domain name in the 'hosts' file as shown in Figure 7.