Manage Your Learning Program as a Tenant
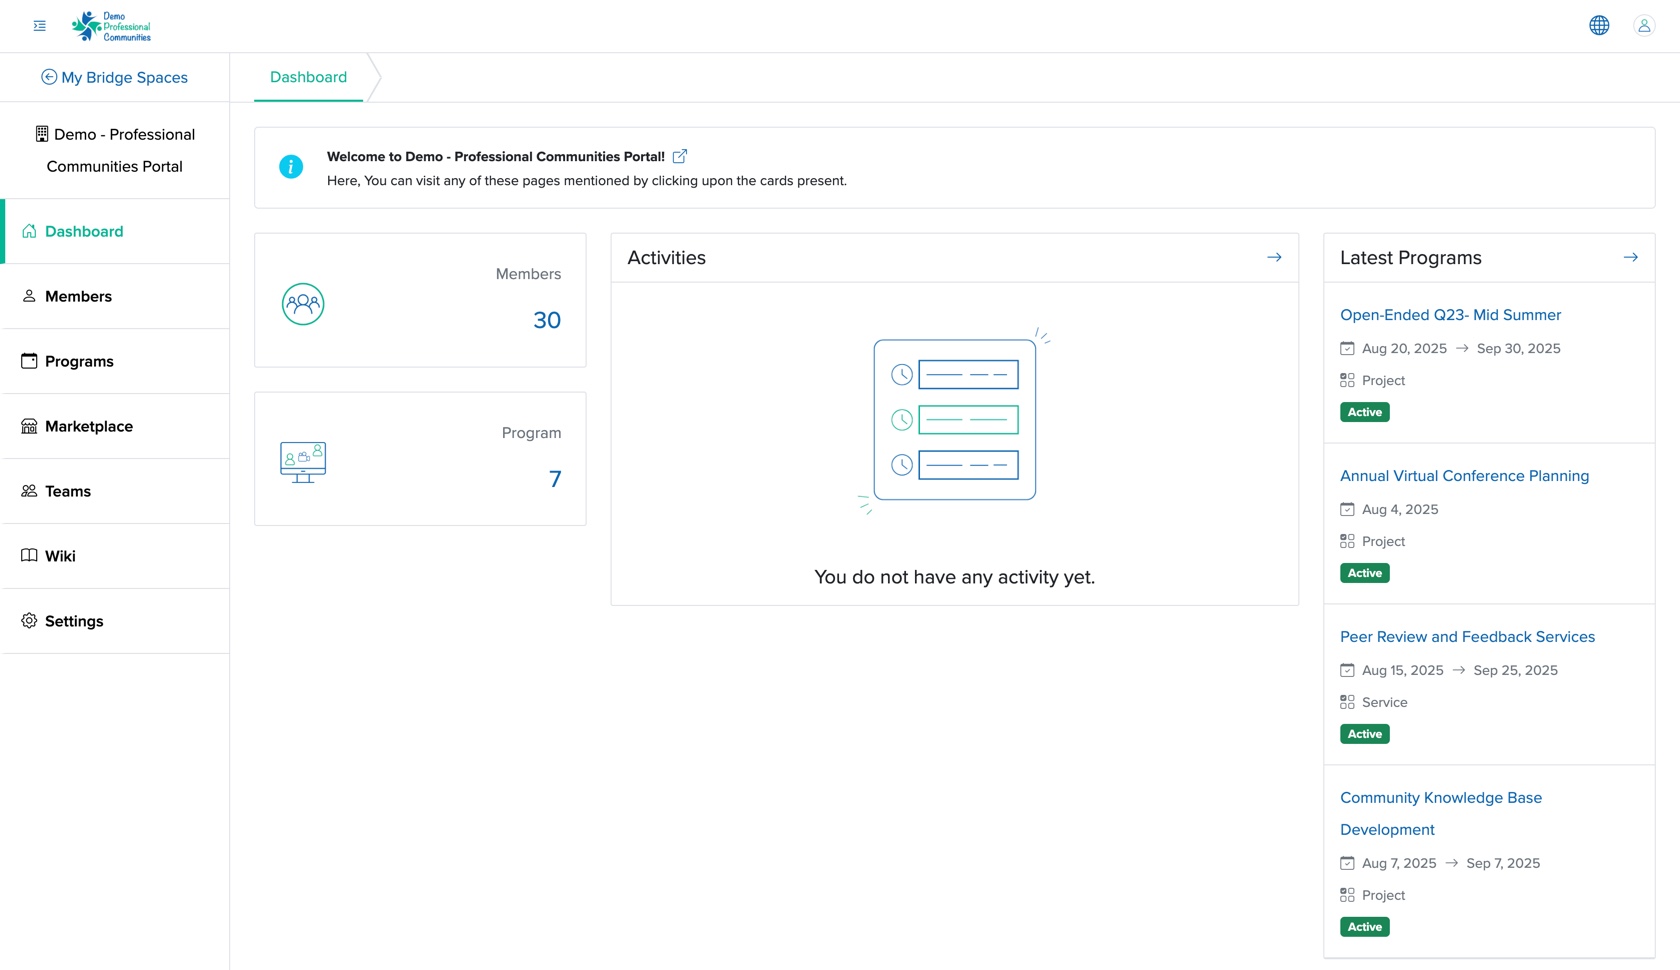
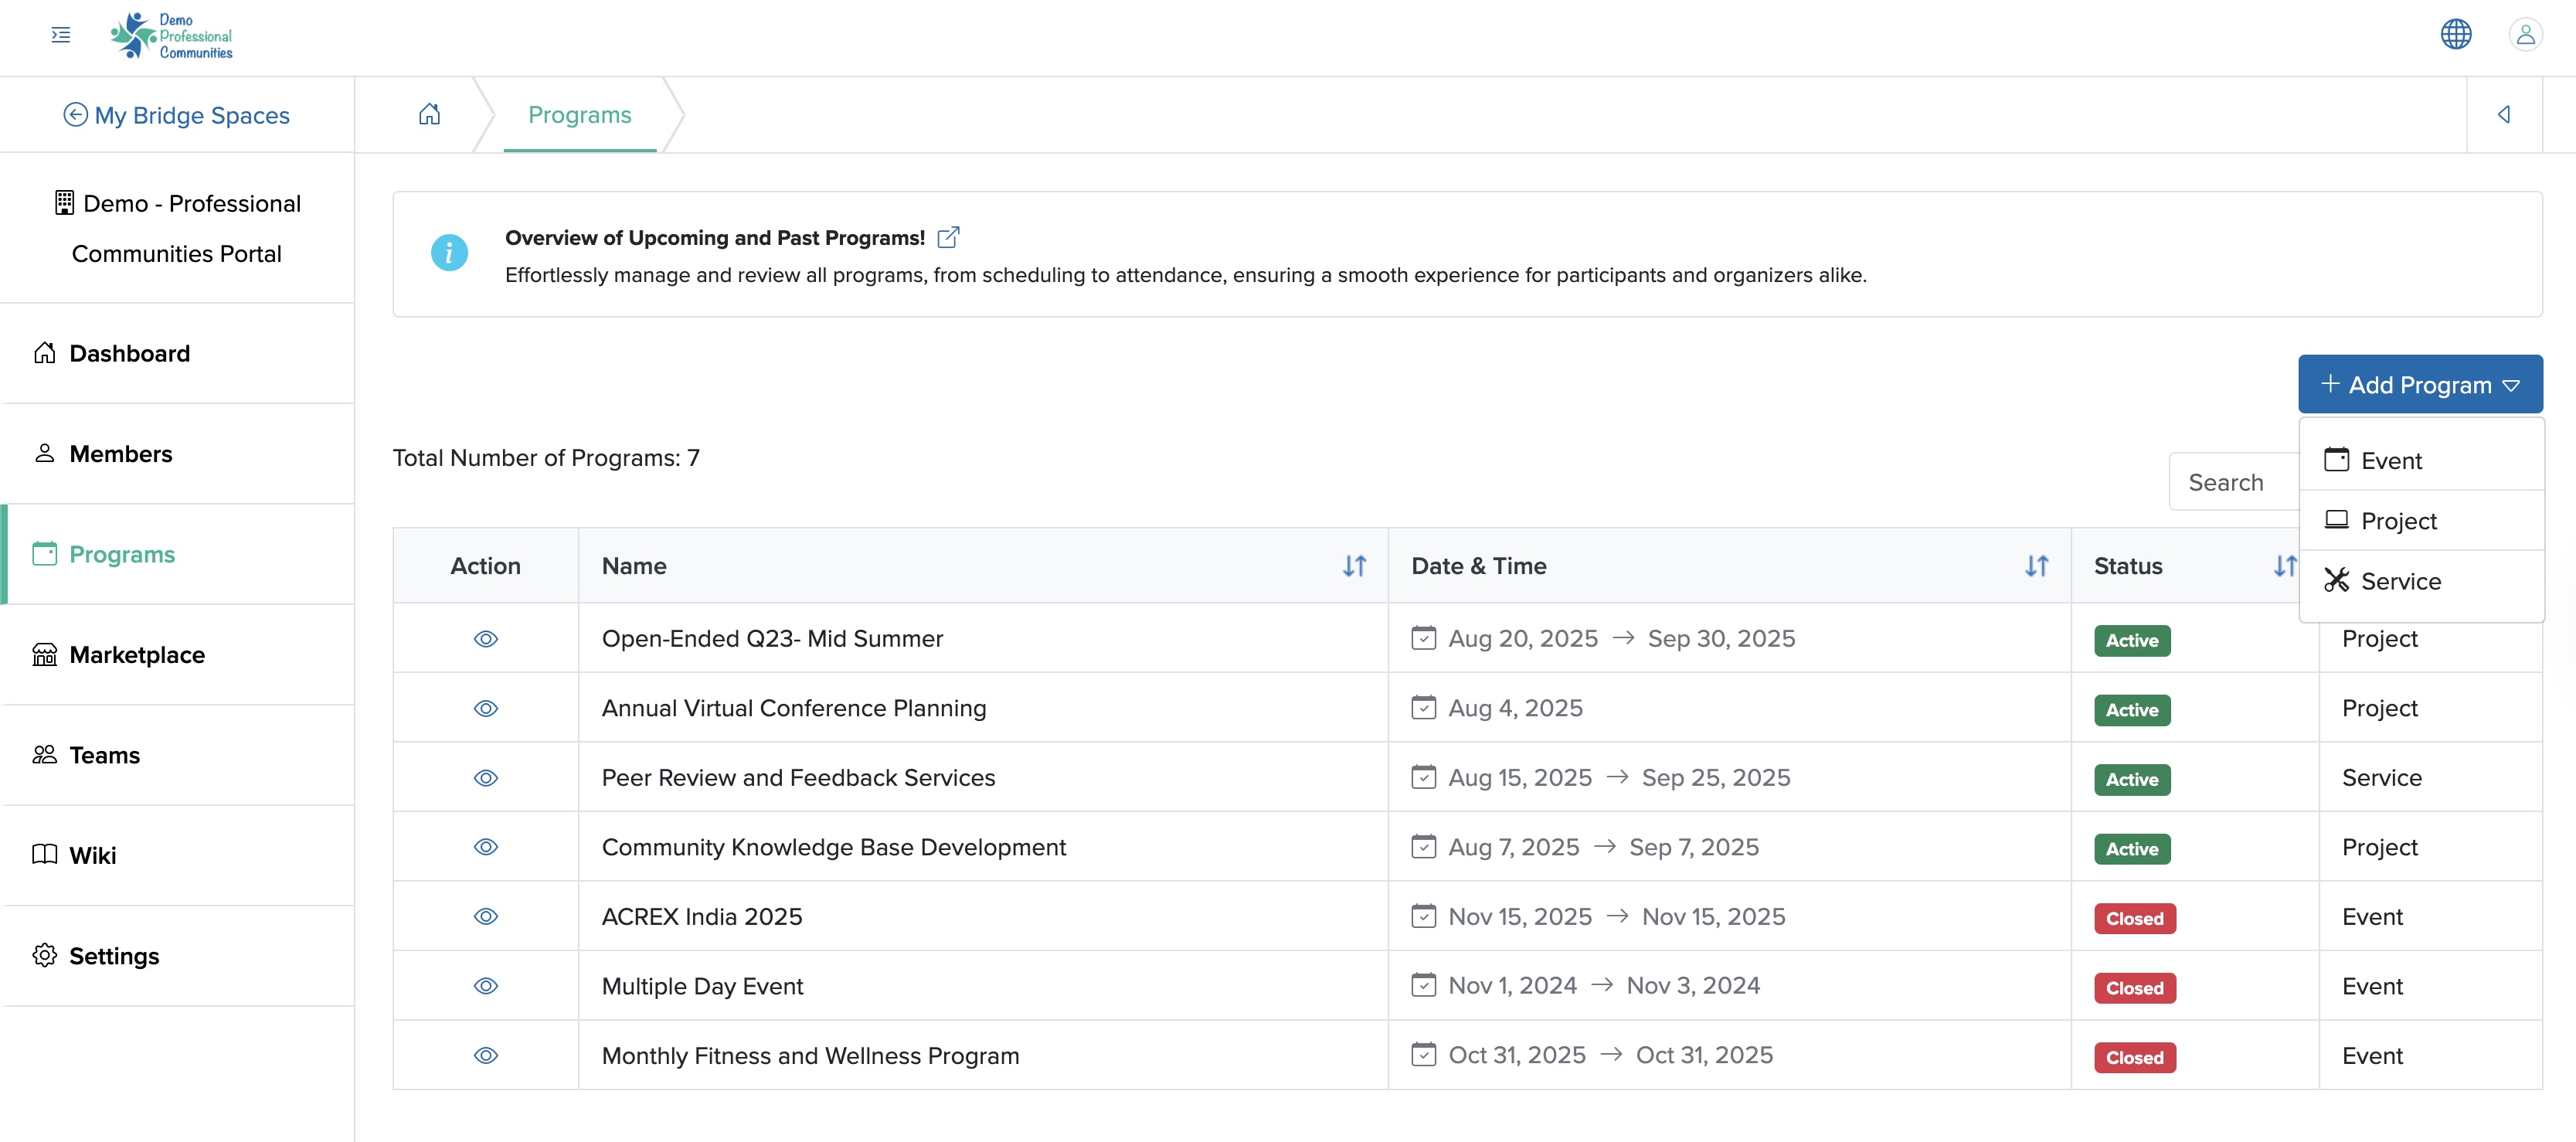
When we click the Programs menu from the Manager Control Panel dashboard, as shown in Figure 1 above, the system redirects us to the program list page, as shown in Figure 2 below.
Add Learning
We can click the + Add Program button on the top right side of the program dashboard screen, as shown in Figure 2 above, and select the Learning menu from the drop-down menu, and the Learning Add screen will open, as shown in Figure 3 below.
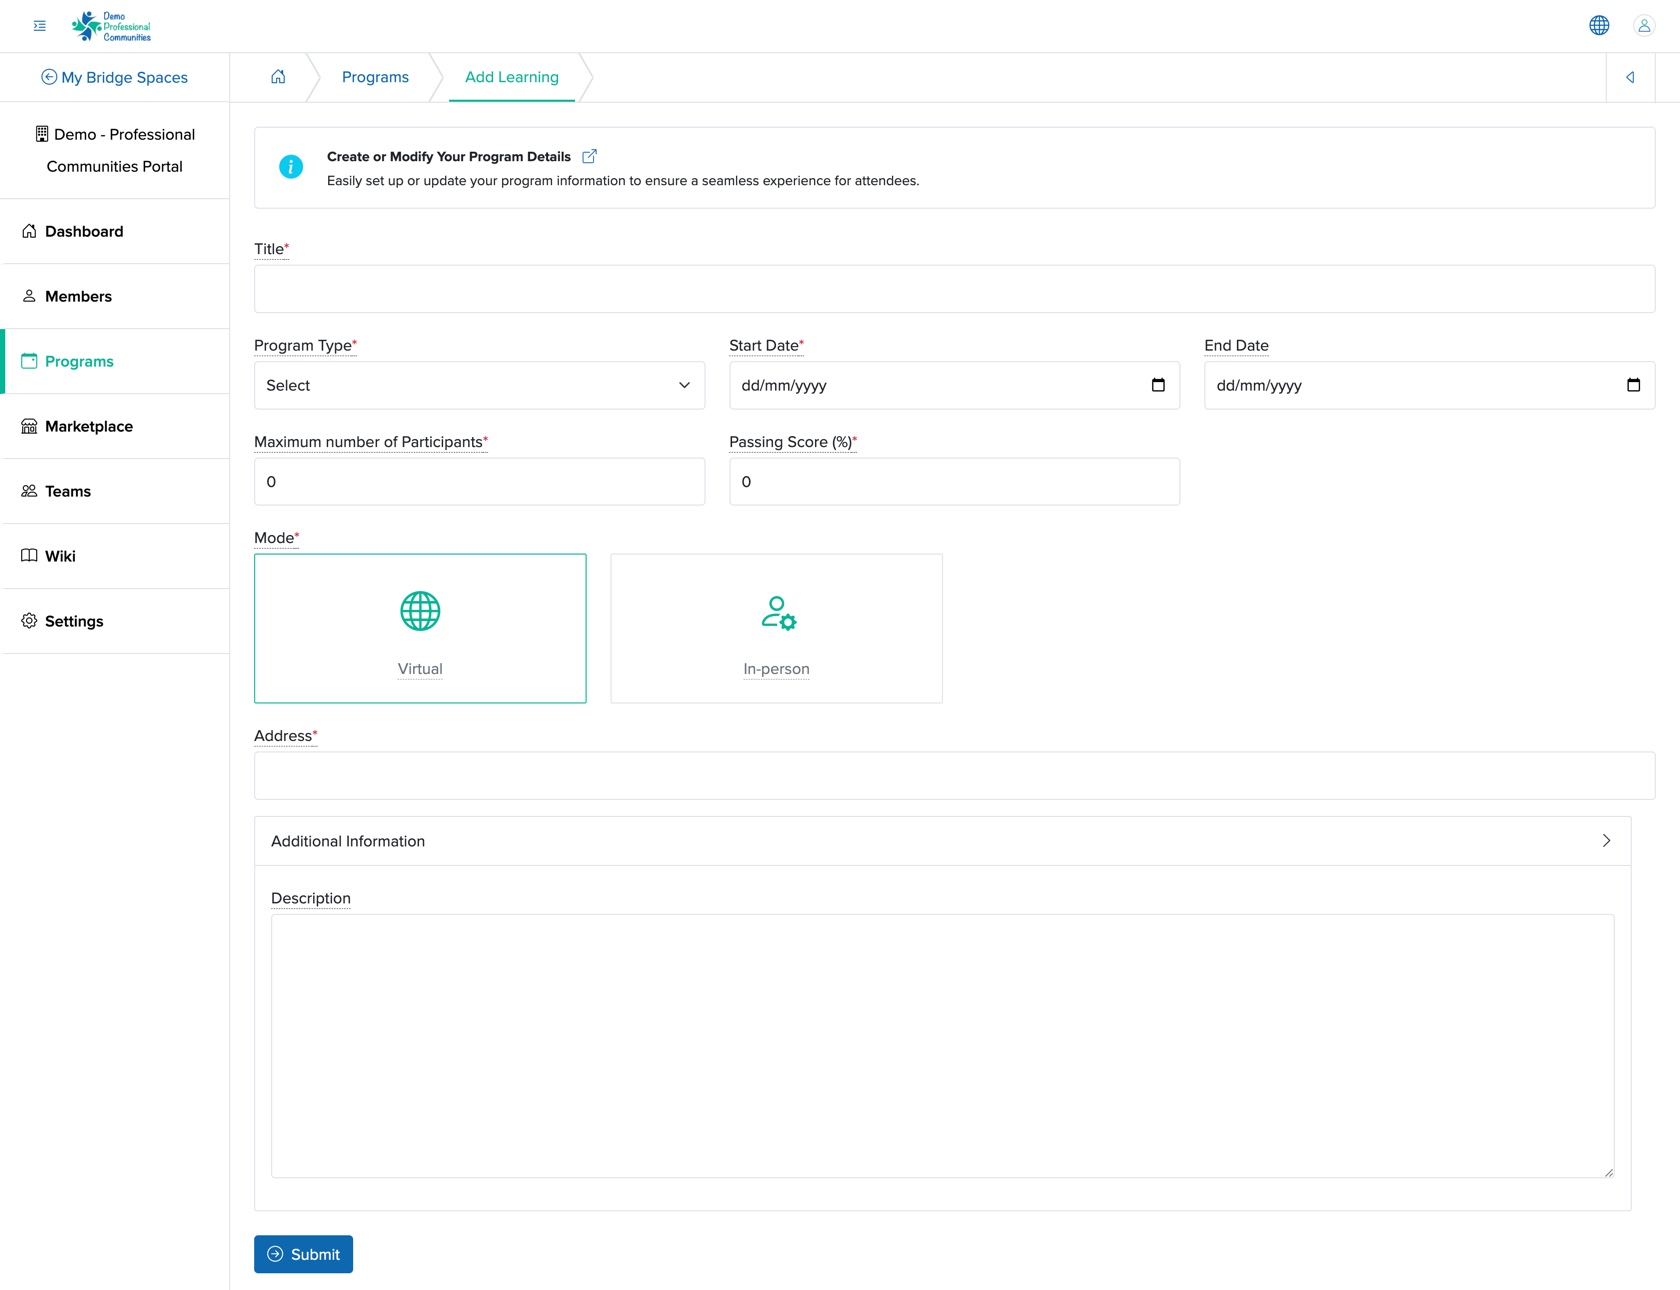
We can enter the details below and click the Submit button to create a new learning program, as shown in Figure 3 above. The details that can be added are:
- Title (Textbox - Mandatory): Title of the Learning Program
- Program Type (Drop-down - Mandatory): Select the type of learning program from the drop-down menu
- Bootcamp
- Certification
- Course
- Hackathon
- Internship
- Open Project
- Webinar
- Workshop
- Start Date (Date and Time Picker - Mandatory): We can select the start date of the learning program
- End Date (Date and Time Picker - Optional): We can select the end date of the learning program
- Maximum number of Participants (Textbox - Mandatory): We can add the number of participants attending the learning program
- Passing Score (%) (Textbox - Mandatory): We can mention the passing score for the learning program in percentage
- Mode (Select Box - Mandatory): We can select the learning type as 'Virtual' or 'In-person'
- Address (Text Box - Mandatory): We can enter the learning program location address. In case of a virtual learning program, we can give the link
- Description (Text Area - Optional): We can provide an overview or key details about the learning program
As shown in Figure 3 above, we can click the Back icon at the top right of the screen to return to the program list page.
Individual Learning Program Dashboard
We can click the View icon associated with any learning type program in the Action column, as shown in Figure 2 above, and the particular Learning Program Dashboard page opens, as shown in Figure 4 below.
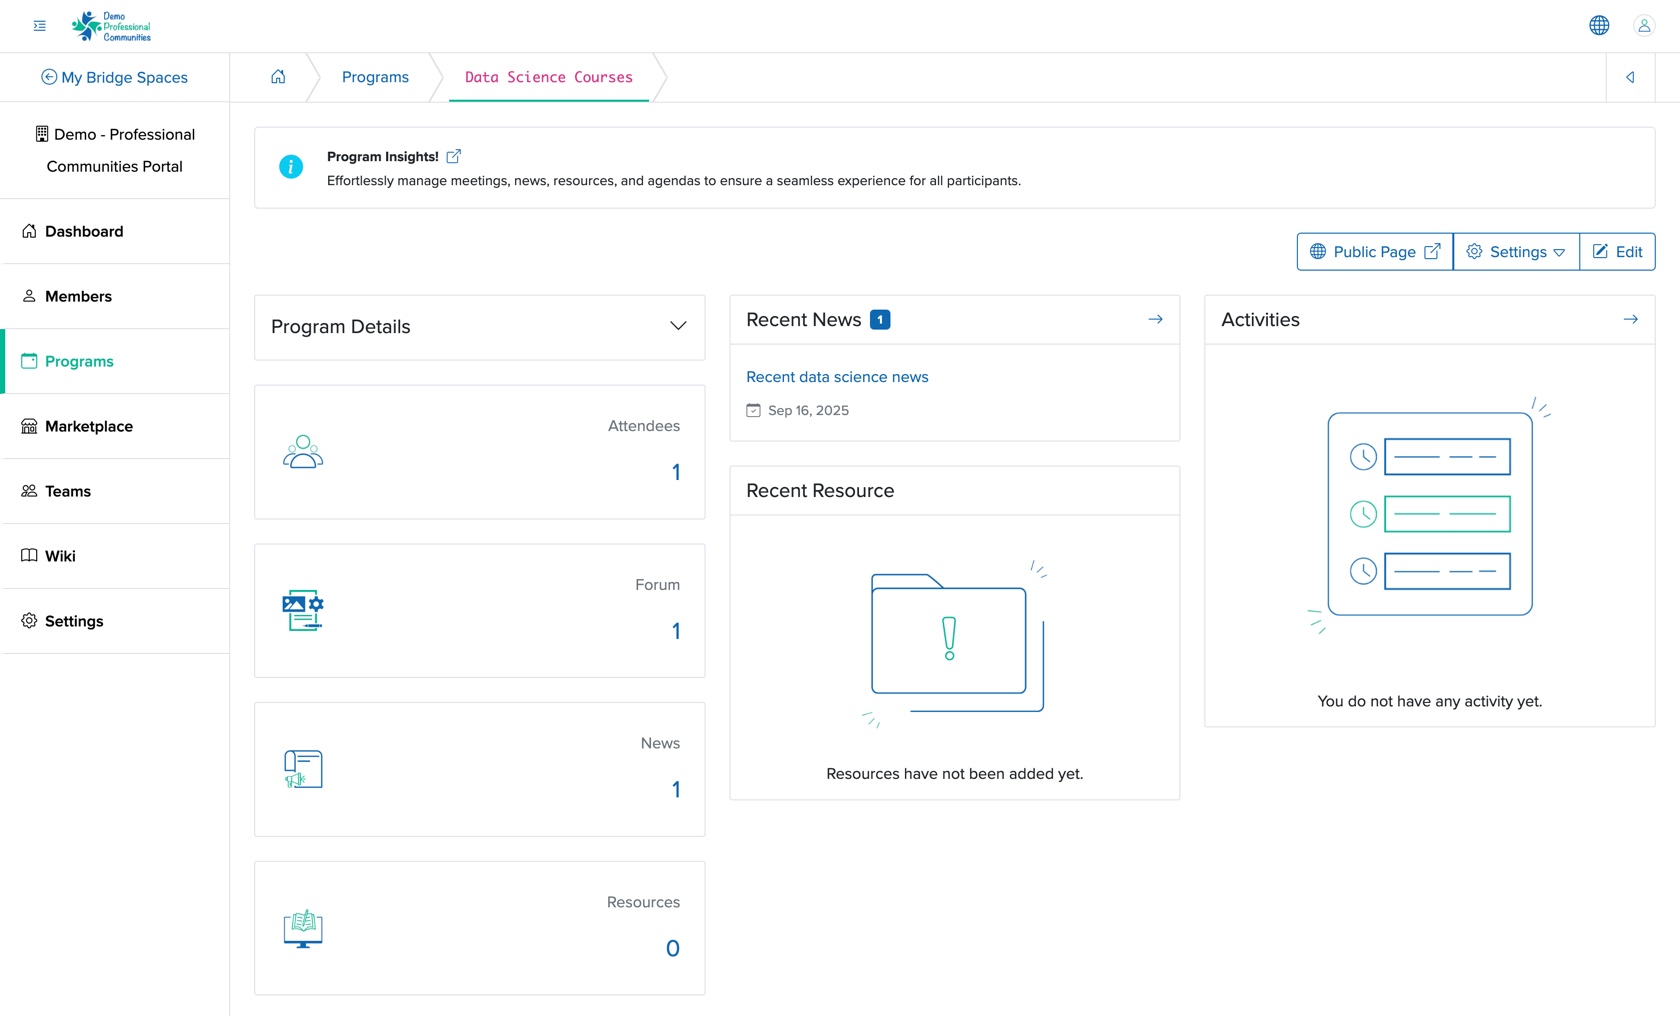
We can see the Learning details, number of Attendees participating, number of Forum added, number of News published, and number of Resources added in card format on the left side of the learning program dashboard screen.
The learning program dashboard's middle section displays the latest News published and the recent Resources added.
The right section displays the Activity related to the learning program.
Learning Program Details
We can click the Down Arrow on the Program Details card header on the learning program dashboard, as shown in Figure 4 above, view the learning program details like Type, and Location, as shown in Figure 5 below.

Attendees
Adding Attendees to a learning program is similar to adding attendees to an event. We can follow the steps mentioned in the Add Attendees section under an event.
Forum
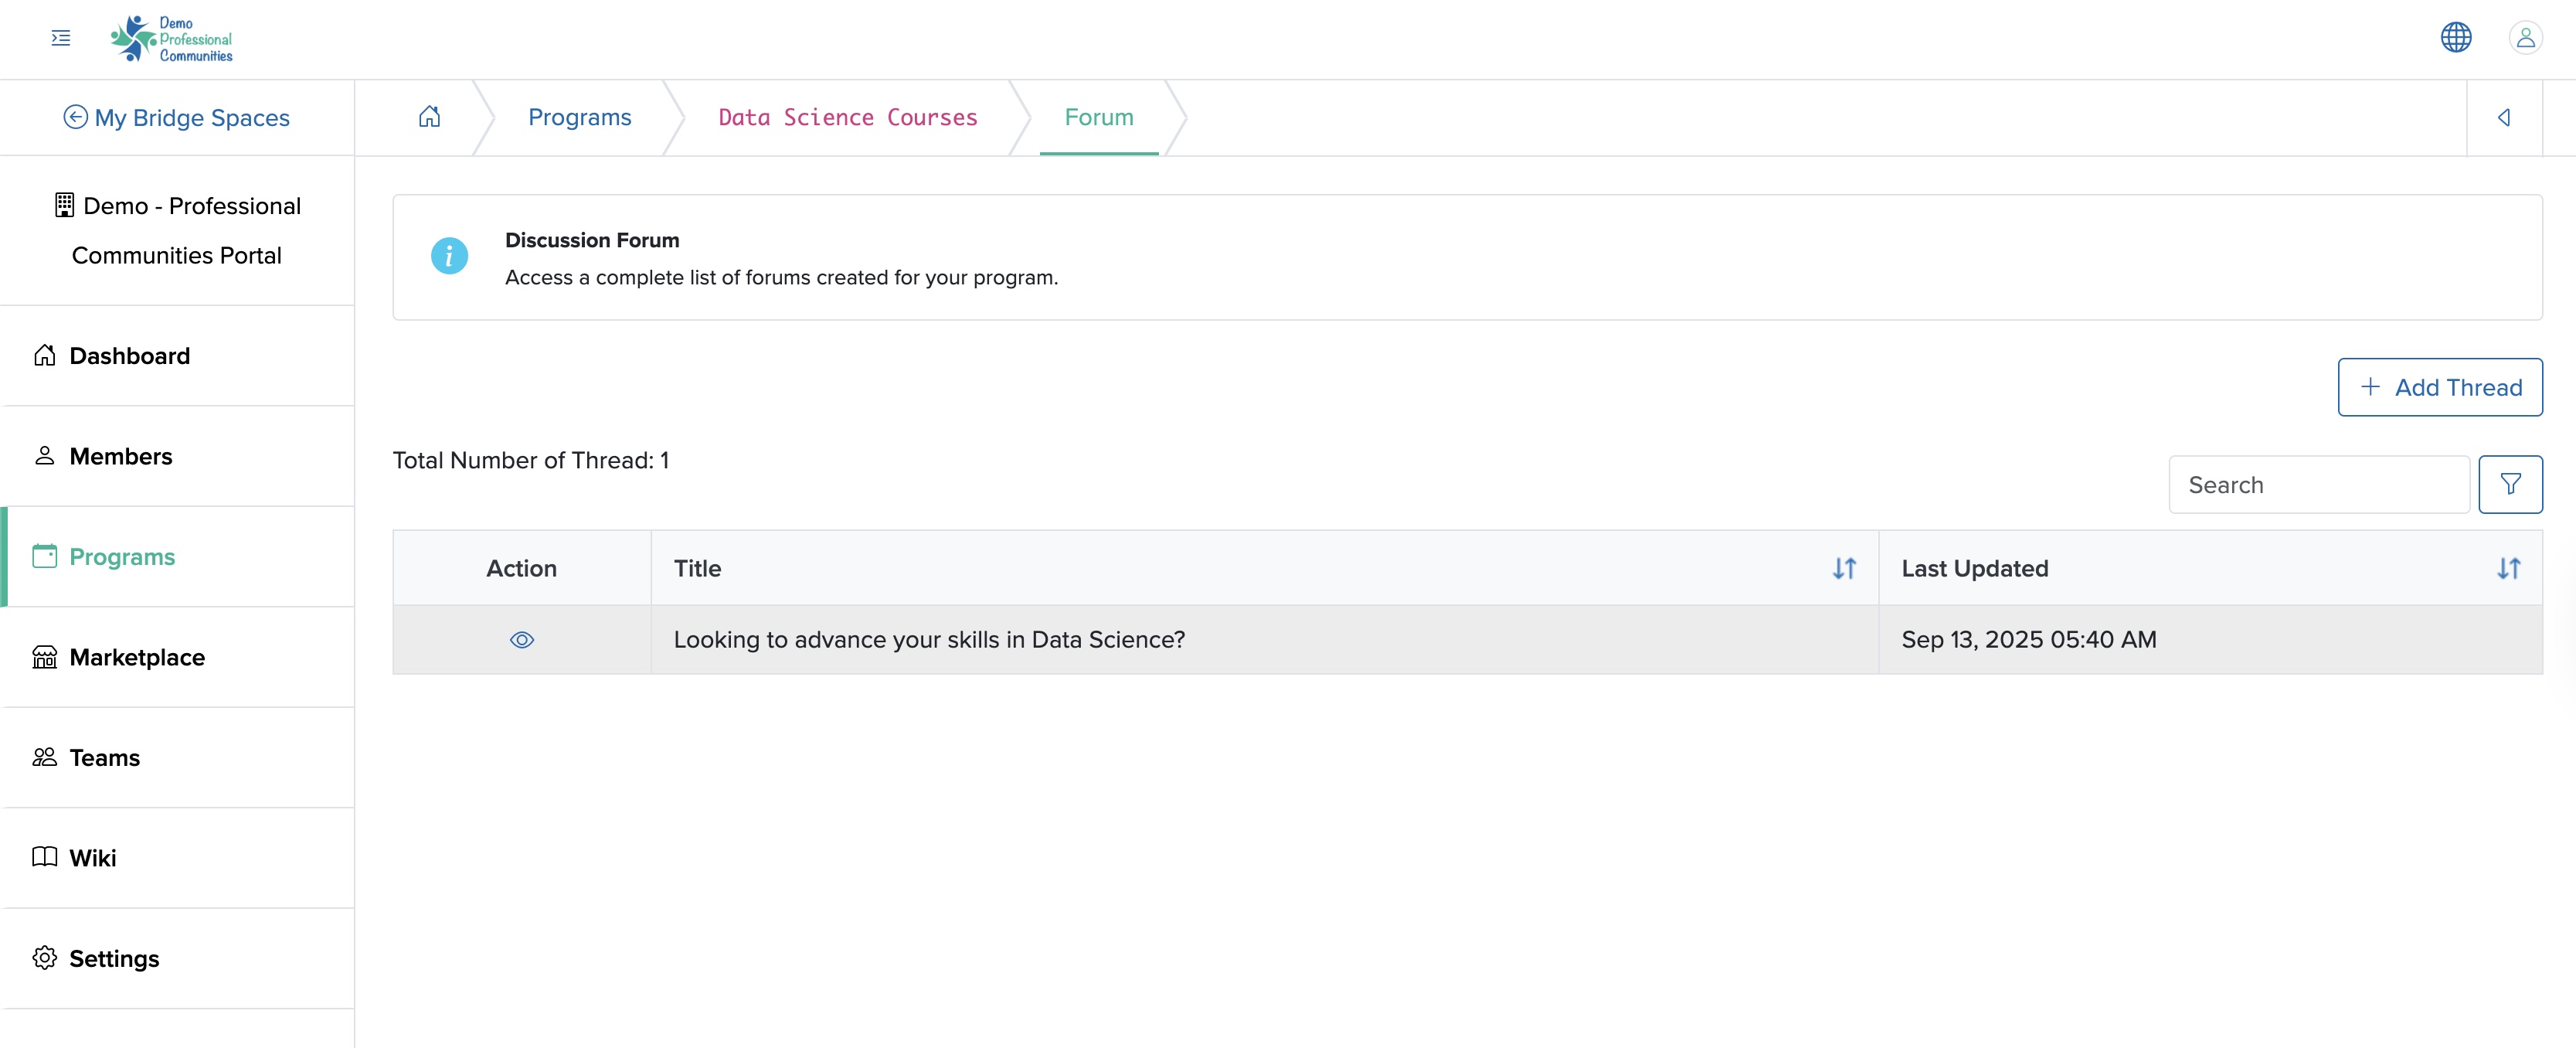
We can click the Forum card on the program dashboard, as shown in Figure 5 above, and the system redirects us to the forum list screen, where all forum threads added to the program appears in a tabular format, as shown in Figure 6 below.
Add Forum
We can click the Add Thread button at the top of the forum list page, and the Add new forum thread page appears, as shown in Figure 7 below.
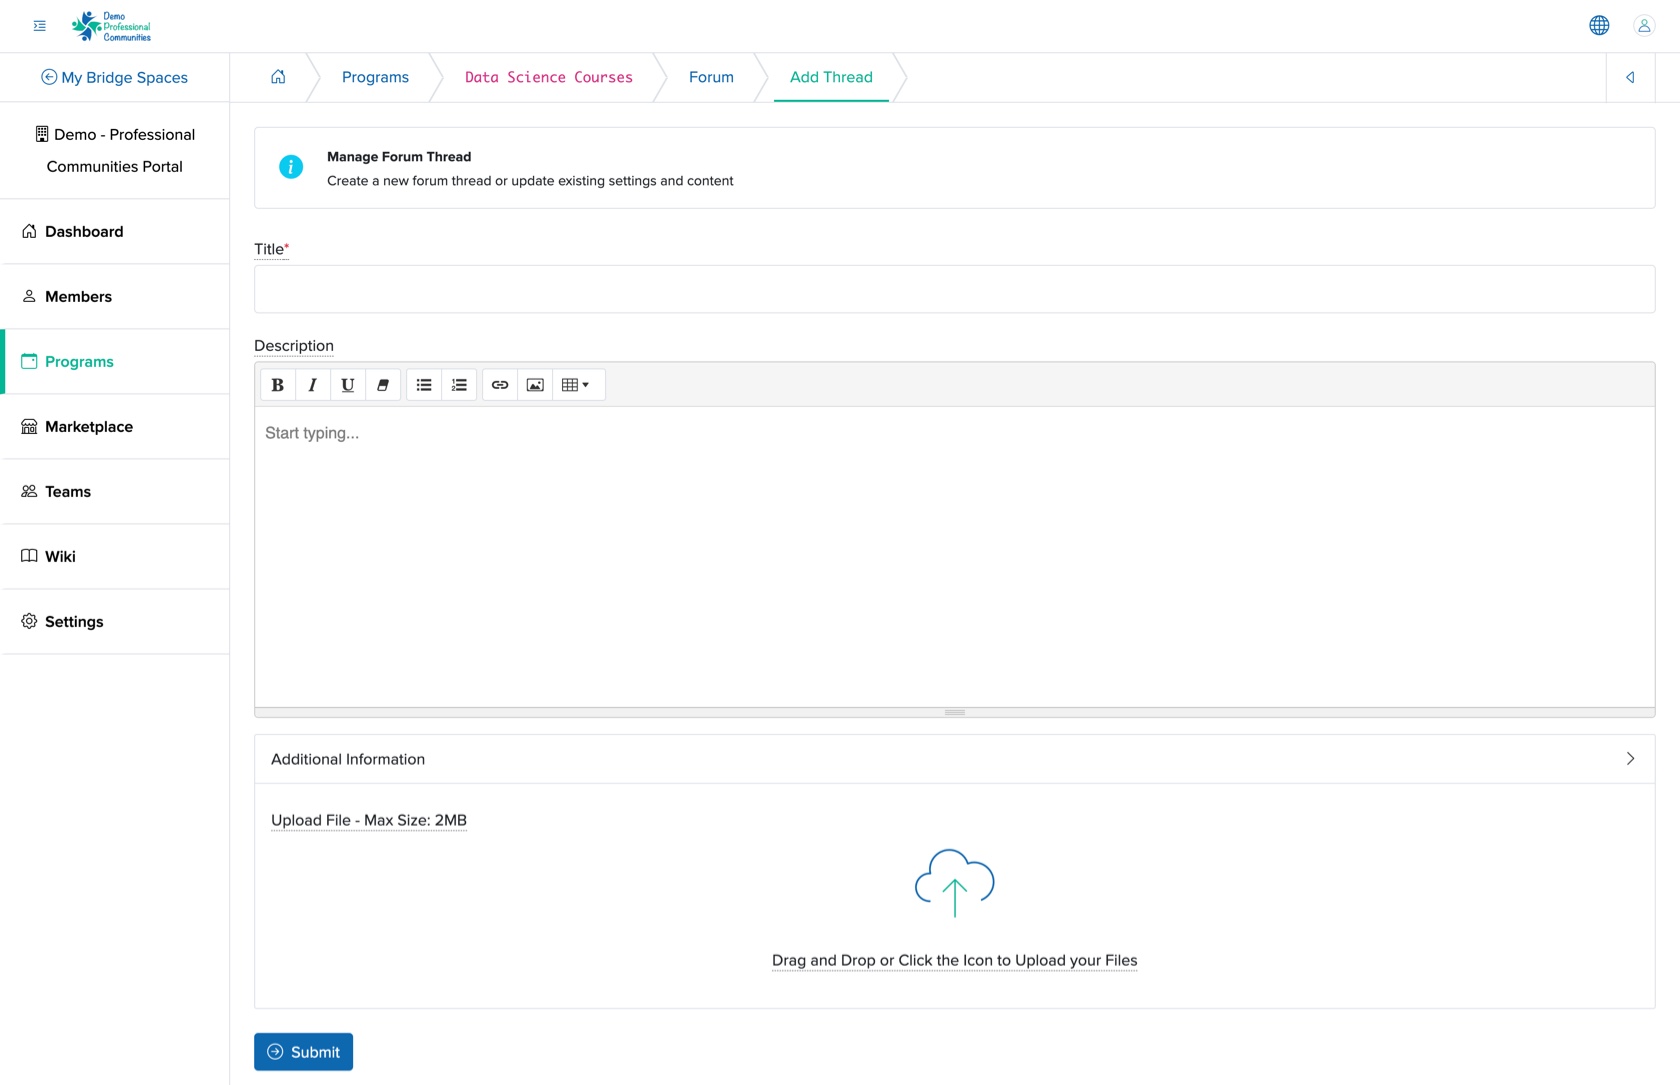
We can enter the details below and click the Submit button to create a new forum thread item, as shown in Figure 7 above. The details that can be added are:
- Title (Textbox - Mandatory): We can enter the Title of the forum thread
- Description (Textarea - Mandatory): We can enter the description of the forum thread
- Upload (File Upload - Optional): We can upload the attachment
View Forum
We can click the View icon associated with each forum row in the forum list page, as shown in Figure 6 above, and the forum thread detail page opens, as shown in Figure 8 below.
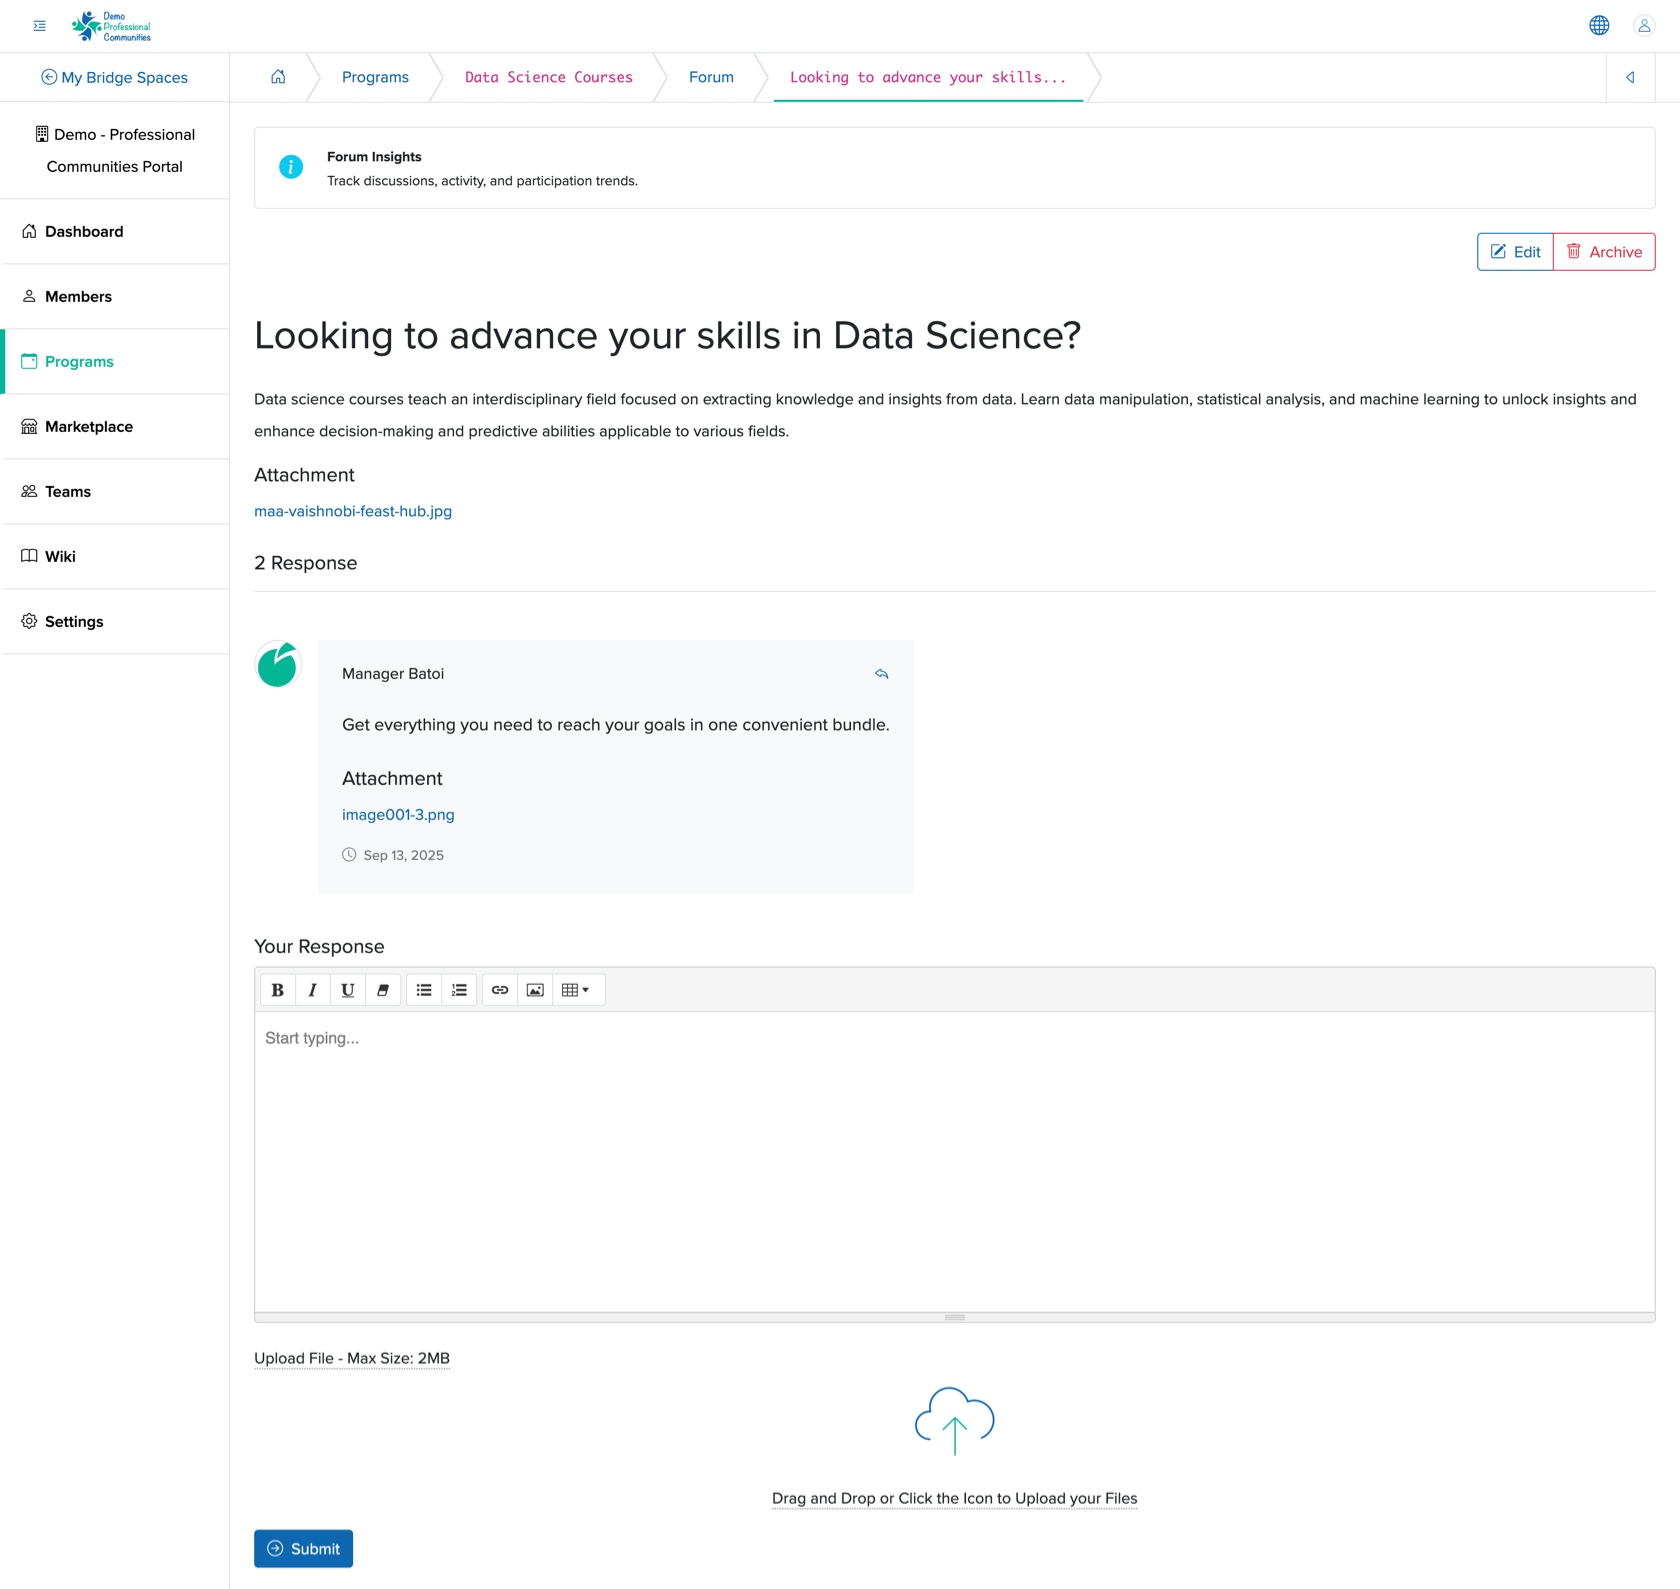
We can see the title, description and the file attachment (if any) on the top section of forum view page, as shown in Figure 8 above. The middile section shows the comment added under the forum and on the bottom section, ‘Your Response’ text editor and option to upload any file will be available, as shown in Figure 8 above.
Add Responce to Forum Thread
We can add the response and click the Submit button to the forum by adding the comment and uploading the related file (if any) on the ‘Your Response’ text editor and file upload section, as shown in Figure 8 above.
Edit Forum
We can click the Edit button on the top right side of the forum thread details screen, as shown in Figure 8 above, and the edit forum thread page opens, as shown in Figure 9 below.
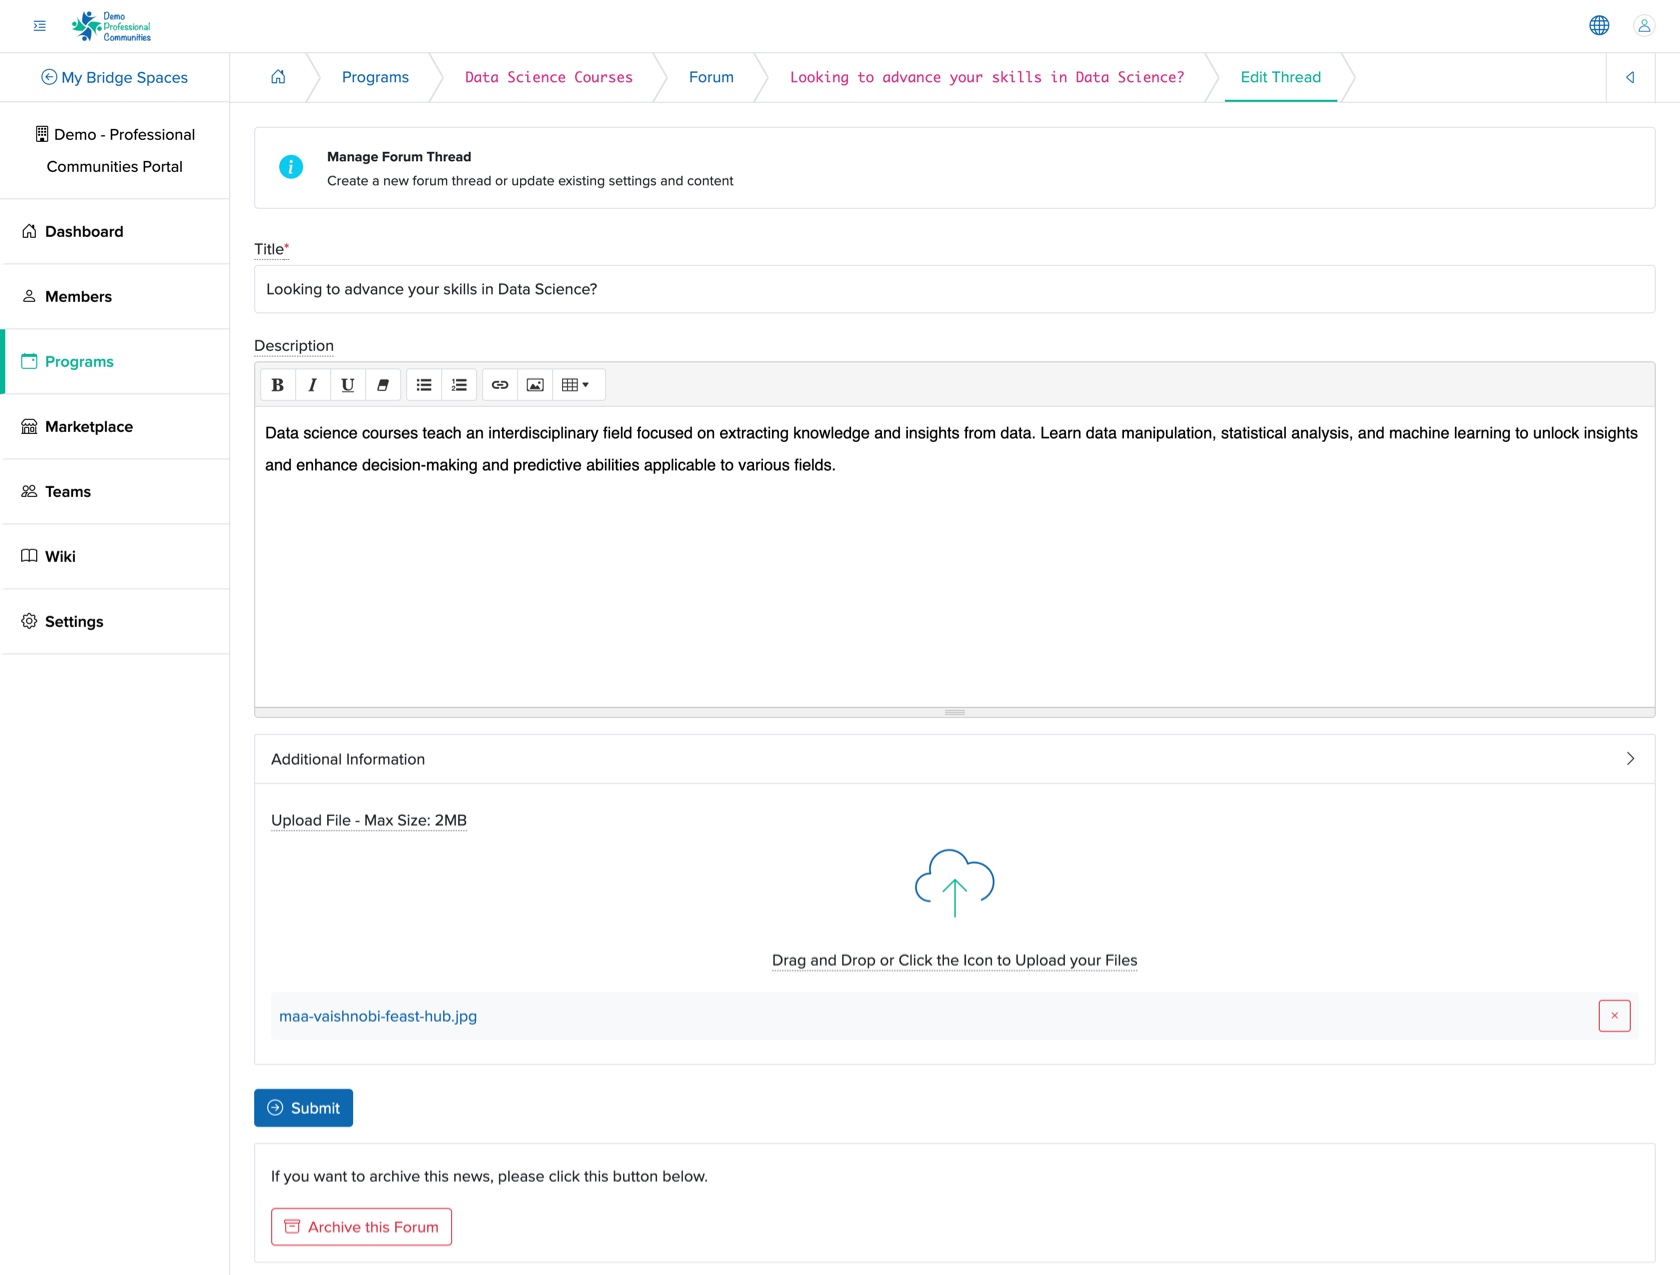
We can edit the details and click the Submit button to update the forum thread, as shown in Figure 9 above:
- Title (Textbox - Mandatory): We can enter the Title of the forum thread
- Description (Textarea - Mandatory): We can enter the description of the forum thread
- Upload (File Upload - Optional): We can upload the attachment
We can archive the news by clicking the Archive this Forum button at the bottom of the Edit screen, as shown in Figure 9 above.
News
Adding News to a learning program is similar to adding news to an event. We can follow the steps mentioned in the Add News section under an event.
Resources
Adding Resources to a learning program is similar to adding resources to an event. We can follow the steps mentioned in the Add Resources section under an event.
Setting
We can click the Settings button at the top of the Individual Learning Dashboard screen, as shown in Figure 4 above, and three options appear, as shown in Figure 10 below.
- Public Page
- Certificate
- Rank Paramenter

Public Page Setting
We can click the Settings button and then the Public Page from the drop menu, as shown in Figure 10 above, and public page setting will appear, as shown in Figure 11below.
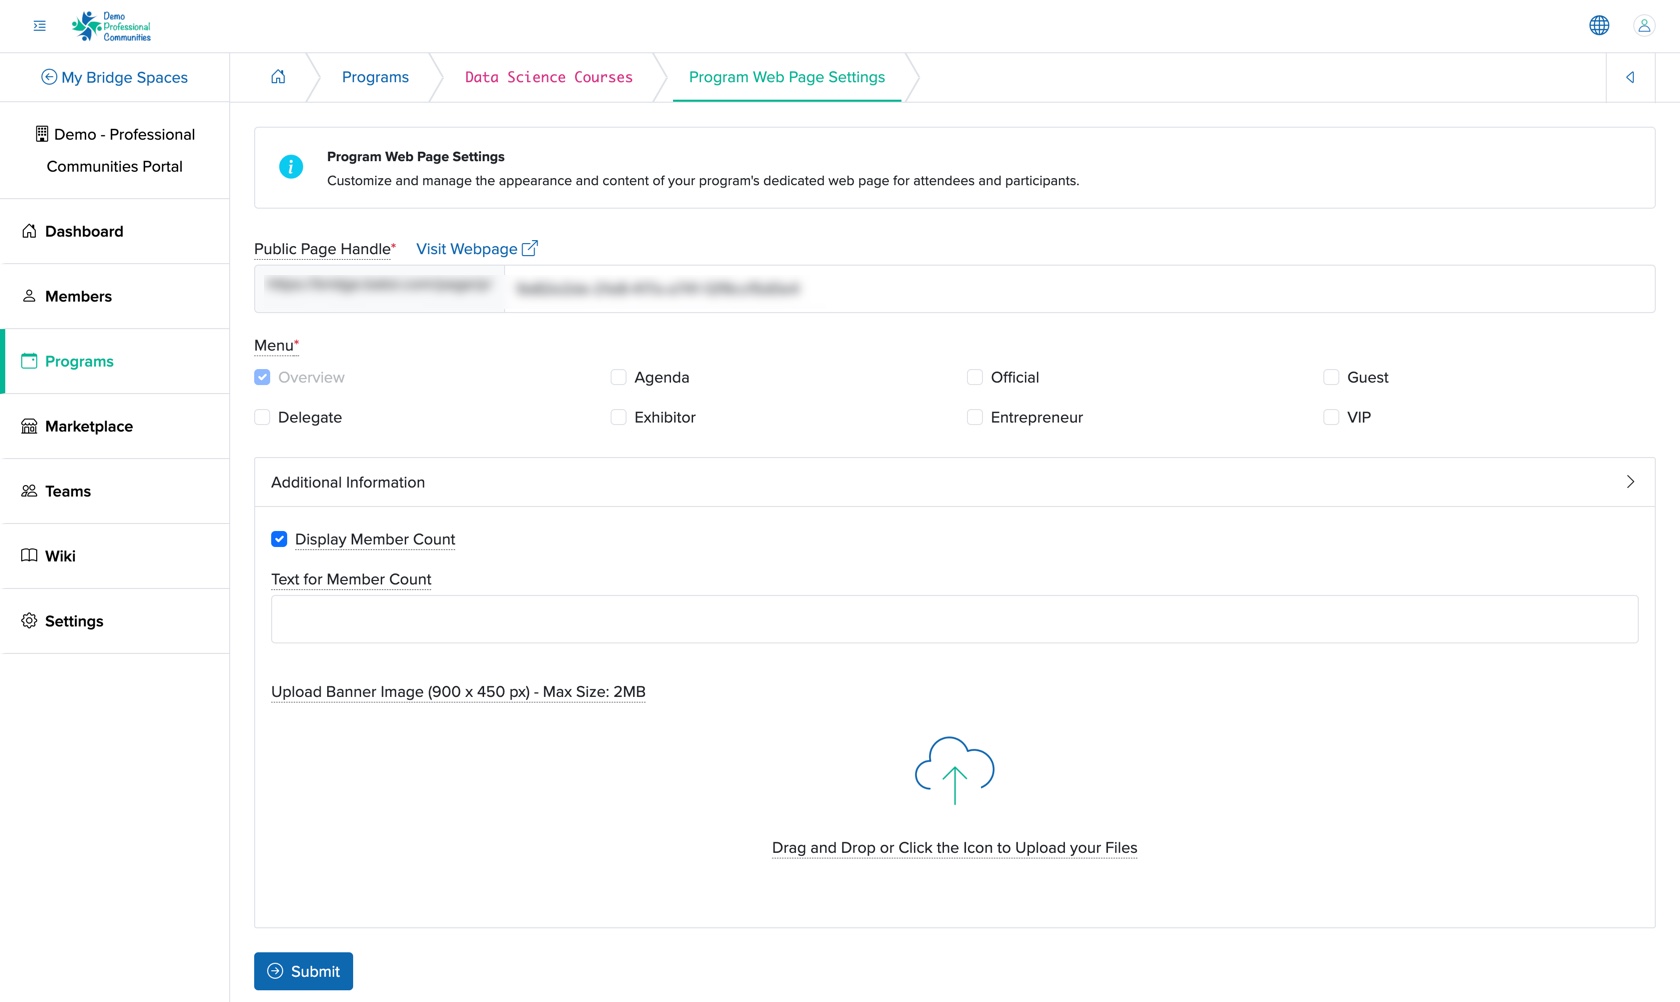
Below are the details we can set:
- Public Page Handle: To set the desired public page url
- Menu: We can selet the menu which will be visible on the public page
- Display Member Count: Show the number of participants attending the learning program
- Upload Banner Image: Customize the public page banner image
We can set the details and click the Submit button to update the public page setting, as shown in Figure 11 above.
Certificate Setting
We can click the Settings button and then the Certificate from the drop menu, as shown in Figure 10 above, and certificate setting will appear, as shown in Figure 12below.
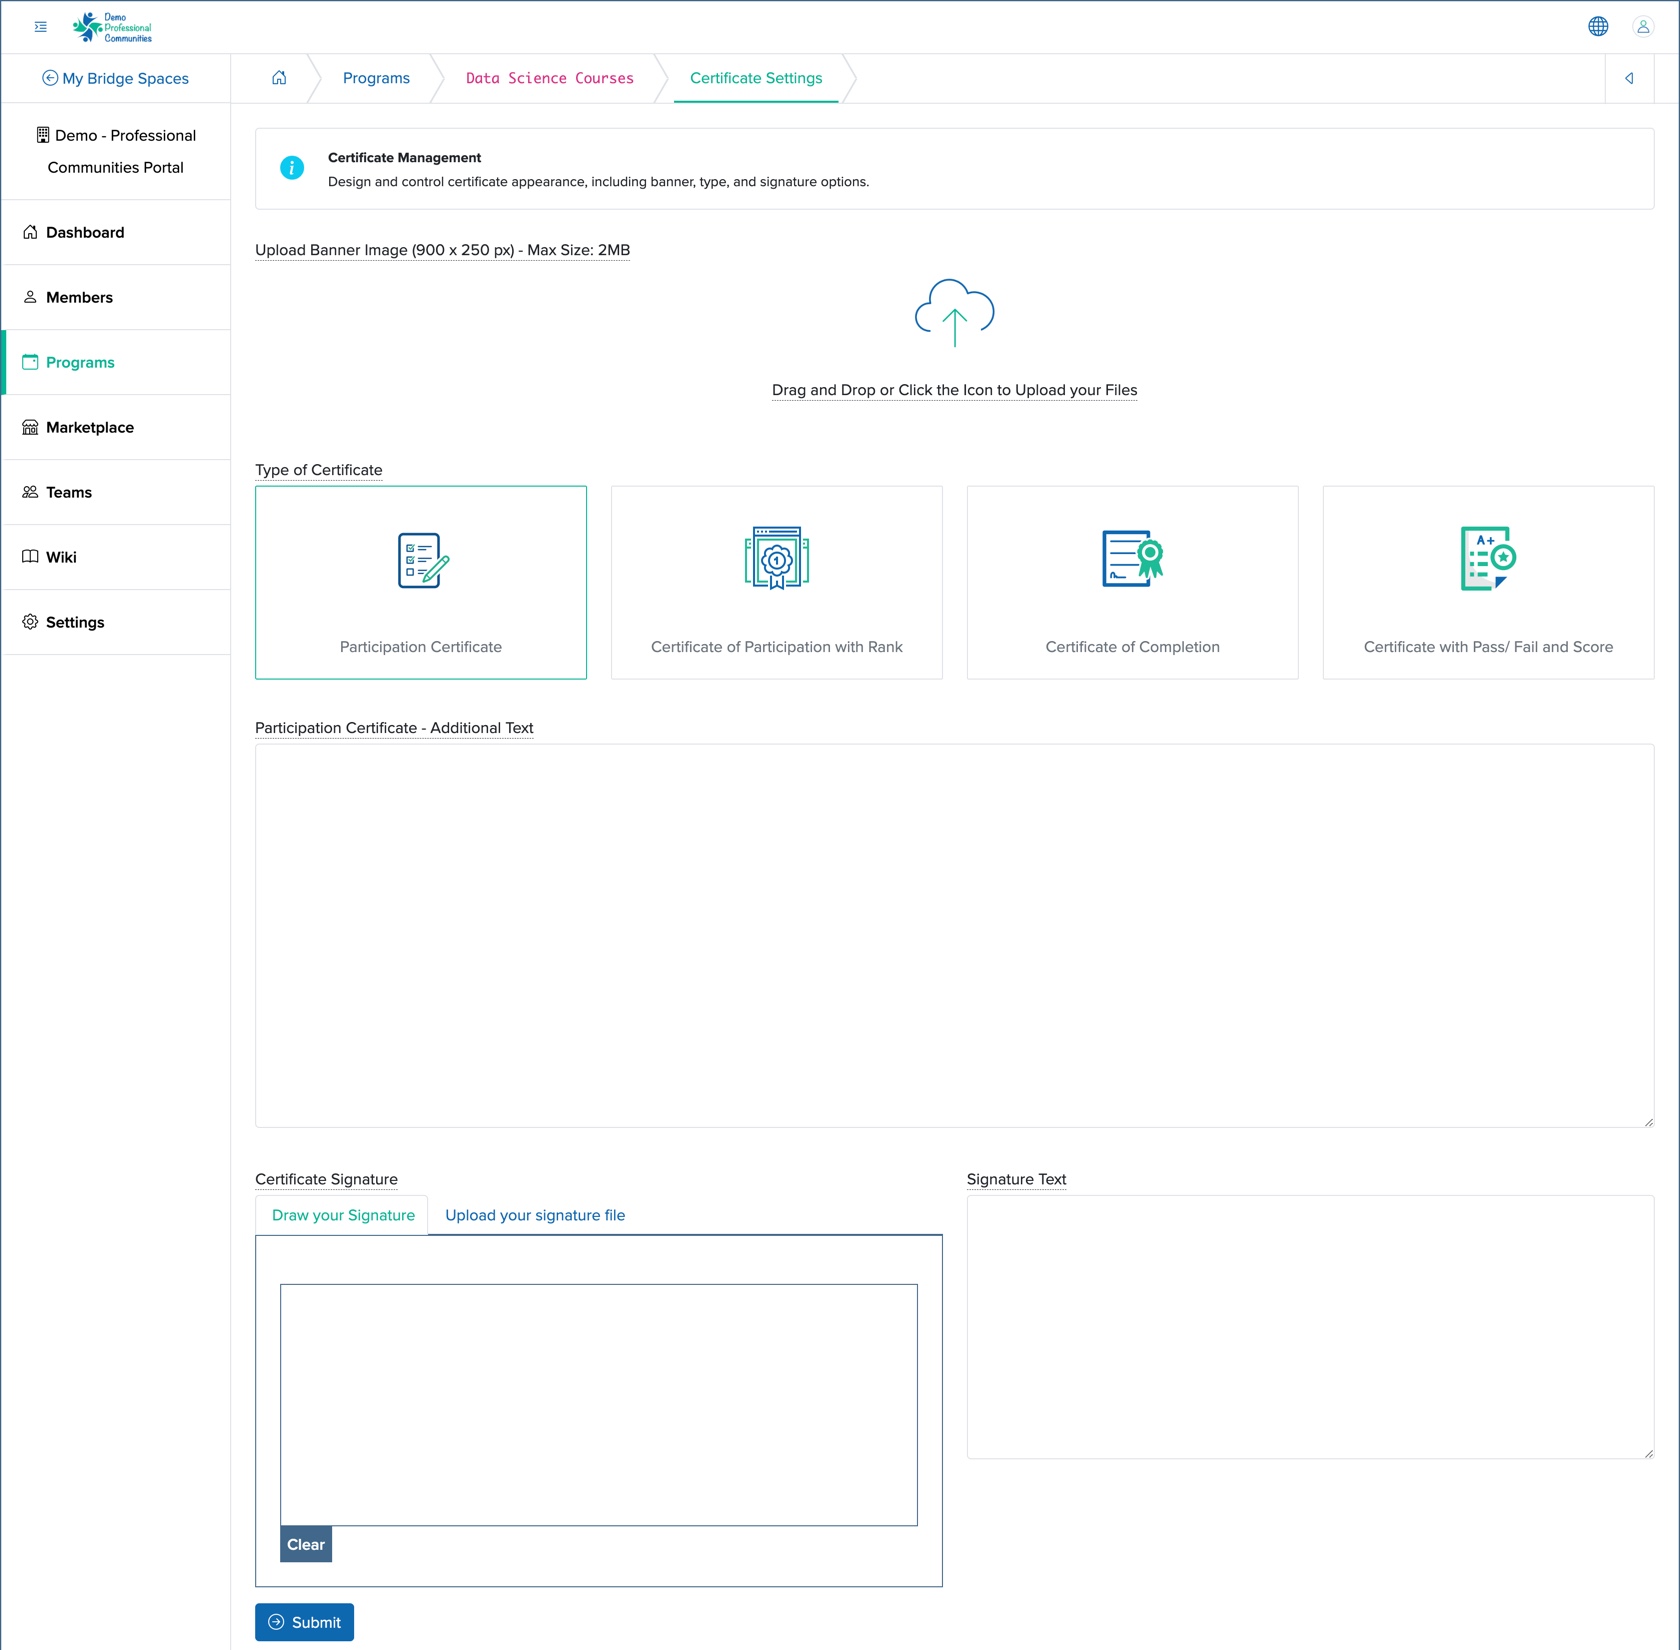
Below are the details we can set:
- Upload Banner Image: Customize the certificate banner image
- Type of Certificate: We can select one option ‘Participation Certificate’, ‘Certificate off Participation with Rank’, ‘Certificate of Completion’ or, ‘Certificate with Pass/Fail with Score’
- Additional Text: We can add your custome text to be displayed in the cerrtificate
- Certificate Signature: Upload or draw the signature of the certificate authority
- Signature Text: Name and Designation of the certificate authority
We can set the details and click the Submit button to update the certificate setting, as shown in Figure 12 above.
Rank Parameter Setting
We can click the Settings button and then the Rank Parameter from the drop menu, as shown in Figure 10 above, and rank parameter setting will appear, as shown in Figure 13below.
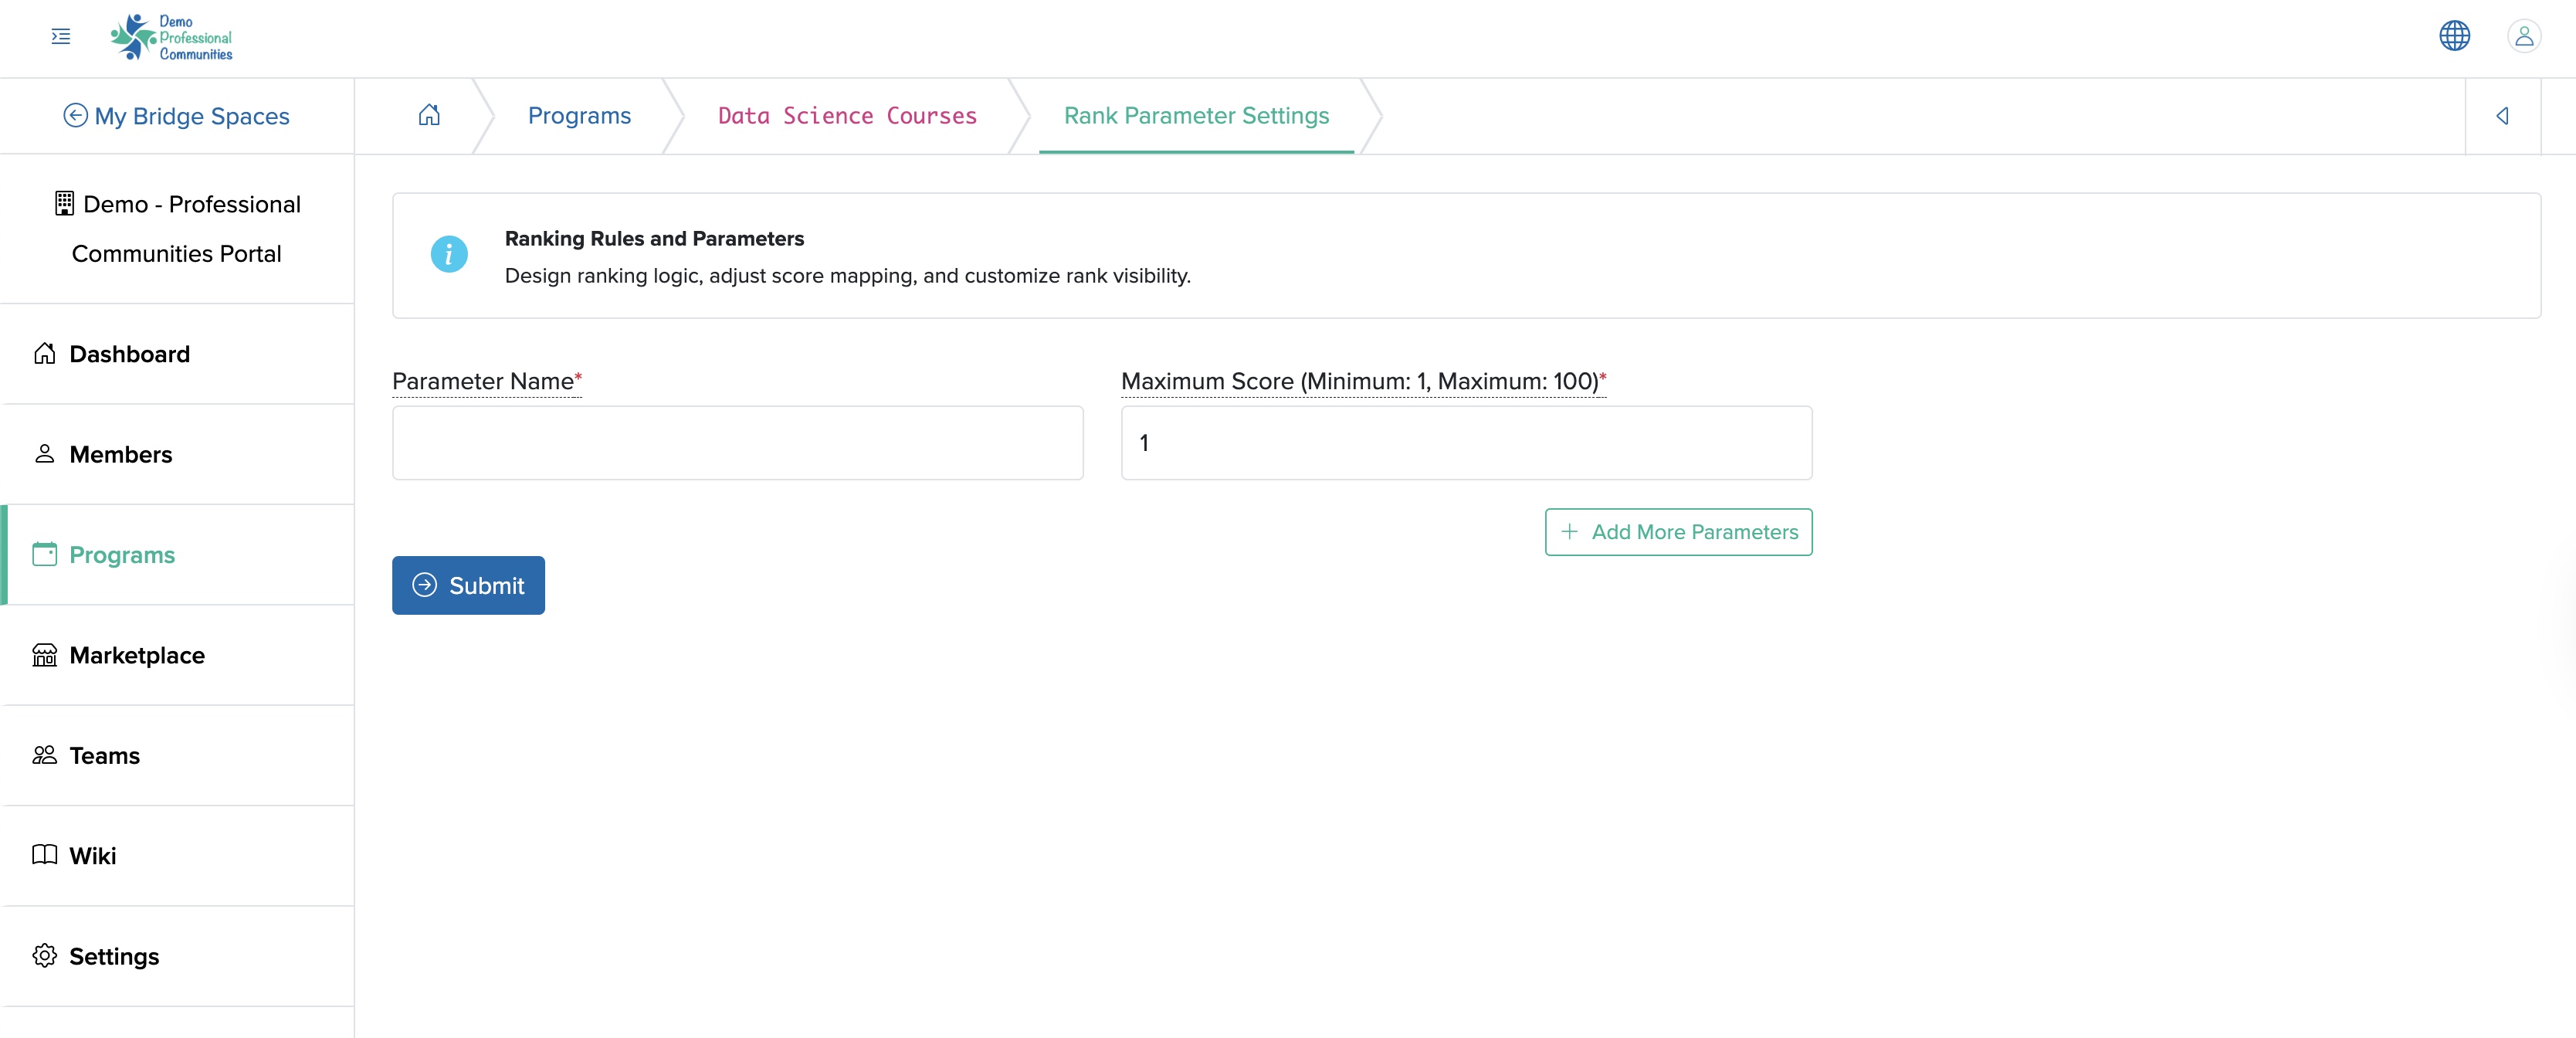
Below are the details we can set:
- Parameter Name: Define the rank parameter
- Maximum Score (Minimum: 1, Maximum: 100): Set the score
- Add More Parameters: Add a new set of parameter
We can set the details and click the Submit button to update the rank parameter setting, as shown in Figure 13 above.
Edit Learning Program
We can click the Edit button at the top of the individual learning program dashboard screen, as shown in Figure 4 above, and the event edit page opens, as shown in Figure 14 below.
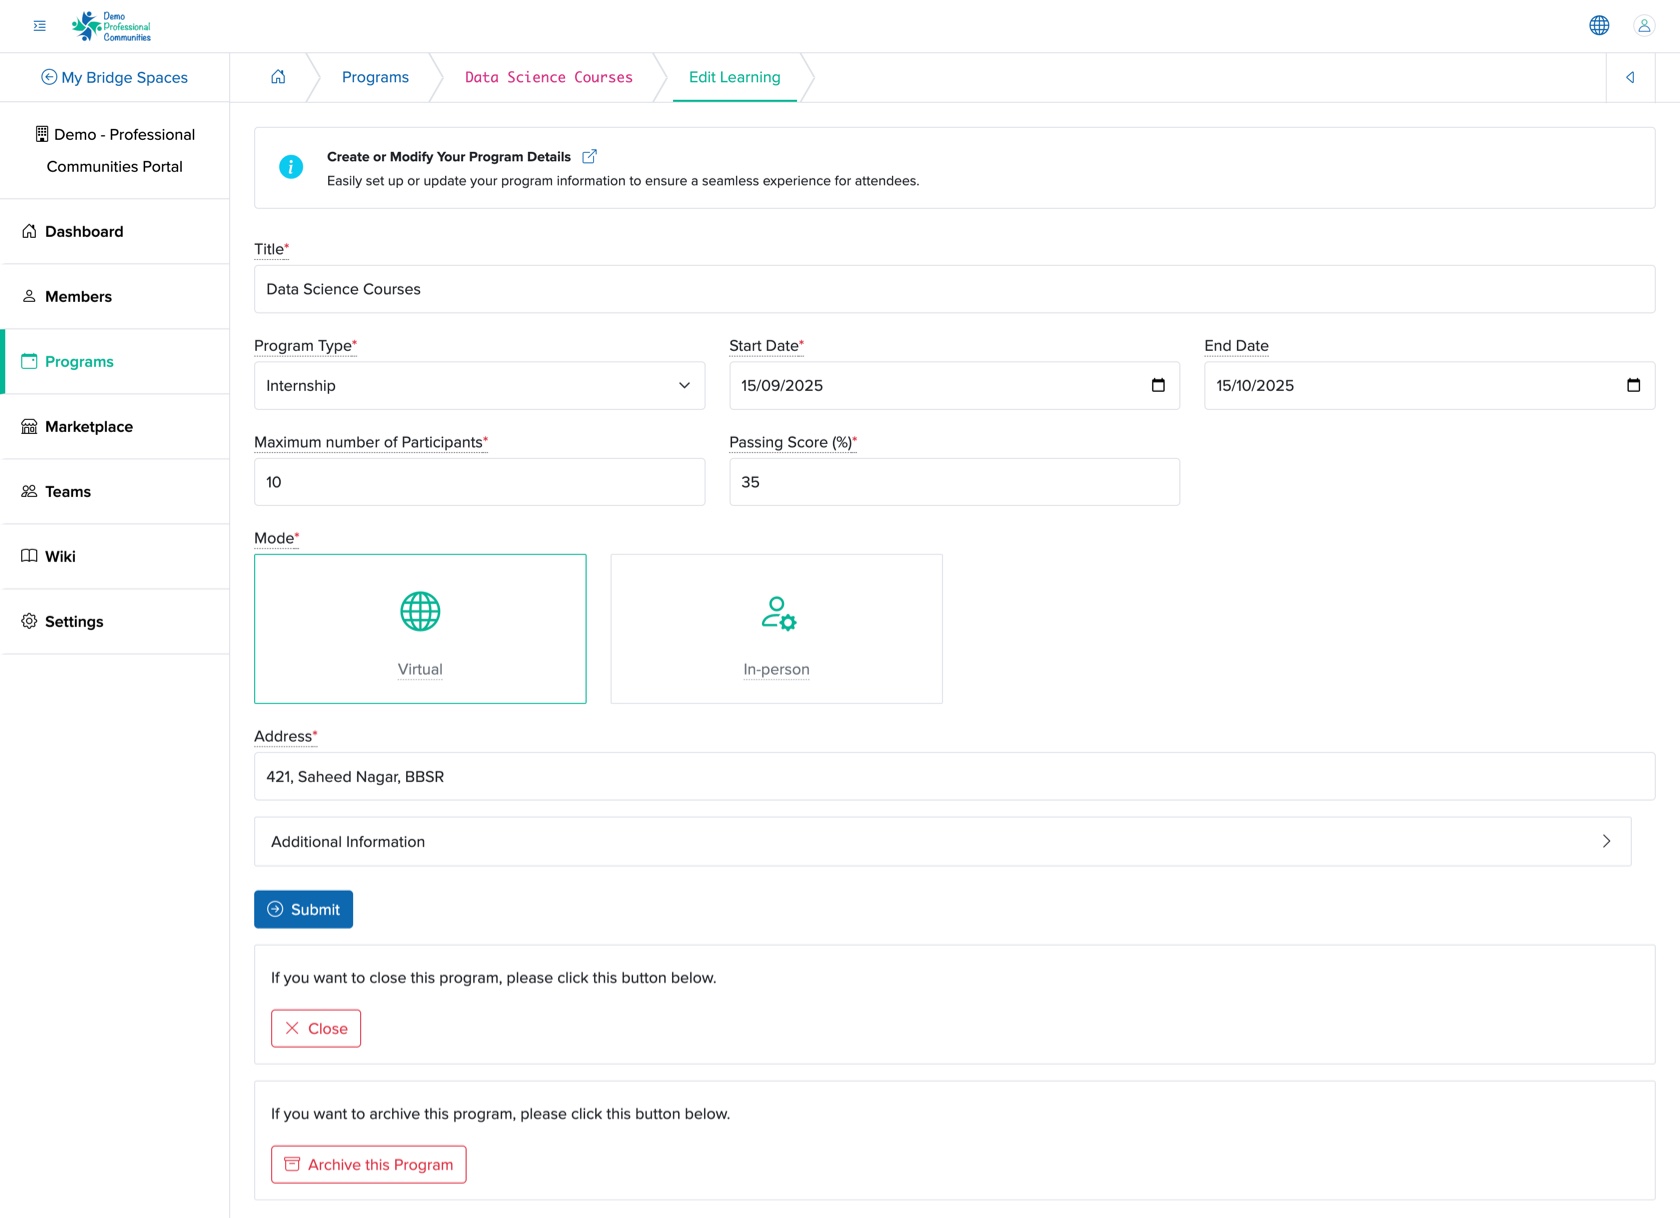
We can edit the details and click the Submit button to update the program, as shown in Figure 14 above.
- Title (Textbox - Mandatory): Title of the Learning Program
- Program Type (Drop-down - Mandatory): Select the type of learning program from the drop-down menu
- Bootcamp
- Certification
- Course
- Hackathon
- Internship
- Open Project
- Webinar
- Workshop
- Start Date (Date and Time Picker - Mandatory): We can select the start date of the learning program
- End Date (Date and Time Picker - Optional): We can select the end date of the learning program
- Maximum number of Participants (Textbox - Mandatory): We can add the number of participants attending the learning program
- Passing Score (%) (Textbox - Mandatory): We can mention the passing score for the learning program in percentage
- Mode (Select Box - Mandatory): We can select the learning type as 'Virtual' or 'In-person'
- Address (Text Box - Mandatory): We can enter the learning program location address. In case of a virtual learning program, we can give the link
- Description (Text Area - Optional): We can provide an overview or key details about the learning program
We can click the Close button at the bottom of the screen, as shown in Figure 14 above, to remove the program from the space.
We can click the Archive this Program button at the bottom of the screen, as shown in Figure 14 above, to archive the program from the space.


